Into an Alfresco ADF app
The Alfresco ADF framework is provided by Alfresco as Open Source, to build custom applications on top of the Alfresco Content Services and Alfresco Process Services. We won’t introduce here the basis of the Alfresco ADF, because we would like to focus the content on the description of how to use the Pentaho dashboard integration into an existing Alfresco ADF application.
The current tutorial is based on Alfresco ADF version 2.0 GA. Please consider that an Alfresco ADF Application is a standard Angular application, so each integration and customisation will follow the best practices widely used to develop using Angular.
To integrate with success your existing ADF application with Pentaho dashboards, you have to follow some few simple steps described below.
- Checking the prerequisites.
- Setting the Alfresco ADF app.
- Customising the login.
- Adding the Pentaho dashboard component.
- Customising the logout.
A final section dedicated to screenshots and troubleshooting and F.A.Q. are defined for a visual example of the expected result and a list of some common issues and the related tips to solve them into your development environment.
1. Checking the prerequisites
Considering that the goal of this tutorial is to integrate one (or more) Pentaho dashboards into an existing Alfresco ADF application, the prerequisites are quite obvious and listed below.
- An existing Alfresco ADF application built using the Yeoman Generator on ADF version 2.0 GA release. If you don't know how an Alfresco ADF application looks like, check the getting started tutorials. You can learn there also how to create a brand new Alfresco ADF application from scratch.
- Of course, the same prerequisites described here, are still valid also in this use case. In brief: you need a Pentaho Business Analytics platform up and running and some samples deployed into its repository.
- Last but not least, the same credentials valid in Alfresco Content Services and Alfresco Process Services must be replicated into Pentaho Business Analytics platform. This task can be done using an LDAP integration (more advanced and out of the scope of this tutorial) or manually, replicating the same users/passwords into the different back-end services. In this case, be sure you added the user
admin@app.activiti.com, with passwordadmin, into the Pentaho Business Analytics platform.
This is all you need to make this integration work into your development environment.
2. Setting the Alfresco ADF app
Starting from an existing Alfresco ADF application built using the Yeoman Generator on ADF, the integration of Pentaho dashboards must be prepared properly, with some initial tasks. Each task defines a precise goal and it is introduced below and detailed in the following paragraphs. If you read the entire documentation of this website, the following steps should look very similar to the integration into a regular Angular application.
2.1. Adding the dependency
The very first step to do is about adding the dependency to thepentaho-dashboardnpm package. To complete the task, edit thepackage.jsonfile and add the following source code.
...,
"dependencies": {
    ...,
        "pentaho-dashboard": "1.0.1"
To find the latest release, check thepentaho-dashboardnpm package directly.
2.2. Setting the proxy
To avoid the cross-origin resource sharing issue, the solution is to redirect the local URI/pentahoto the correct URL (in our examplehttp://192.168.1.118:8080/pentaho). In the development environment the task can be easily completed using theproxy.conf.jsonfile, as follows.
...,
"/pentaho": {
  "target": "http://192.168.1.118:8080",
  "secure": false,
  "changeOrigin": false
}
2.3. Including the JS script
The HTML page requires one JS file to be included in theheadtag. To develop this, edit the.angular-cli.jsonfile and add the following configuration.
...,
"scripts": [
  ...,
  "../node_modules/pentaho-dashboard/src/assets/pentahoHeaderScript.js"
Be aware that the .angular-cli.json file must exist in an Angular application, directly into the root folder of the project. If you don't see it suing the file explorer, it could be hidden according to the default settings of your Operating System.
2.4. Importing the PentahoDashboardModule
To import the requested module in the project, edit thetsconfig.jsonfile in the root folder of the ADF application and setup theincludeproperty as described below.
{
  "compileOnSave": false,
  "compilerOptions": { ... },
  "include": [
    "src/**/*",
    "node_modules/pentaho-dashboard/index.ts"
Once done, edit thesrc/app/app.module.tsfile and add the source code as described below.
...
import { PentahoDashboardModule } from 'pentaho-dashboard';
...
@NgModule({
  imports: [
    ...,
    PentahoDashboardModule
2.5. Installing the package
Downloading and installing thepentaho-dashboardpackage is straightforward, executing the following command into a terminal.
npm install
Once done, run thenpm startcommand and open a browser athttp://localhost:4200. You won't see nothing different from the initial version of your Alfresco ADF application, but since now, the app is ready to use the Pentaho login, logout and dashboards.
3. Customising the login
Getting a valid Pentaho session into an Angular application has been already described here. In the following tasks you can find the right approach to use the Alfresco ADF login component, in this specific use case.
Using your preferred IDE, edit the login.component.html file, stored into the src/app folder anche changed it according to the following source code.
<adf-login
  ...
  (executeSubmit)="loginToPentaho($event)"
  (success)="redirect($event)">
</adf-login>
Once done, edit the login.component.ts file, stored into the src/app folder anche changed it as described below.
...
import { PentahoDashboardService } from 'pentaho-dashboard';

...

  constructor(private pentahoDashboardService: PentahoDashboardService) { }

  loginToPentaho(event: any) {

    if (this.pentahoDashboardService.isNotLoggedIn()) {
      this.pentahoDashboardService.setUsername(event.values.controls['username'].value);
      this.pentahoDashboardService.setPassword(event.values.controls['password'].value);
      this.pentahoDashboardService.logIn(null);
      if (this.pentahoDashboardService.isNotLoggedIn()) {
        console.log('Cannot login on Pentaho. Please try again.');
      }
    }
  }

  redirect(event: any) {
    window.location.replace('/');
  }
4. Adding the Pentaho dashboard component
In practical use cases, the dashboard is showed into a dedicated Angular component. In this task we will show how to add a regular Angular component to render the Pentaho dashboard into it.
The first task is to modify the app.module.ts file, stored into the src/app of your Alfresco ADF project. Using your preferred IDE, edit the file and add the source code as follows. This task will add a new component named dashboard1 to the project. The component will be available at the URL http://localhost:4200/dashboard1.
...
import { Dashboard1Component } from './dashboard1/dashboard1.component';

...

const appRoutes: Routes = [
  {
    path: 'dashboard1',
    component: Dashboard1Component
  },
  ...

@NgModule({
  ...
  declarations: [
    ...,
    Dashboard1Component
  ]
  ...
Once done, create the src/app/dashboard1 folder and fill it with an empty file named dashboard1.component.css. Then create a file named dashboard1.component.html and fill it with the following content.
<div>
  <pentaho-dashboard
    id = "dashboard1"
    pentahoPath = "/public/sample1.wcdf">
  </pentaho-dashboard>
</div>
Now it's time to create a file named dashboard1.component.ts and fill it with the following content.
import { Component } from '@angular/core';
import { Router } from '@angular/router';
import { PentahoDashboardService } from 'pentaho-dashboard';

@Component({
  selector: 'dashboard1',
  templateUrl: './dashboard1.component.html',
  styleUrls: ['./dashboard1.component.css']
})
export class Dashboard1Component {

  constructor(
    private router: Router,
    private pentahoDashboardService: PentahoDashboardService) {

    if (this.pentahoDashboardService.isNotLoggedIn()) {
      this.router.navigate(['/login']);
    }
 }

}
To complete the task, edit the app.component.html file into the src/app folder and add the following link in the app menu.
...
  <a mat-button href="" routerLink="/dashboard1">Dashboard</a>
Now you are ready to access to the application and dive into the dashboard available at the URL http://localhost:4200/dashboard1.
5. Customising the logout
A missing piece is the logout from an existing session. To complete the task, edit the app.component.ts file stored into the src/app folder and change the source code method as follows.
...
import { PentahoDashboardService } from 'pentaho-dashboard';

...
  logout() {
    this.authService.logout().subscribe(() => {
      this.pentahoDashboardService.logOut("/login");
    });
  }
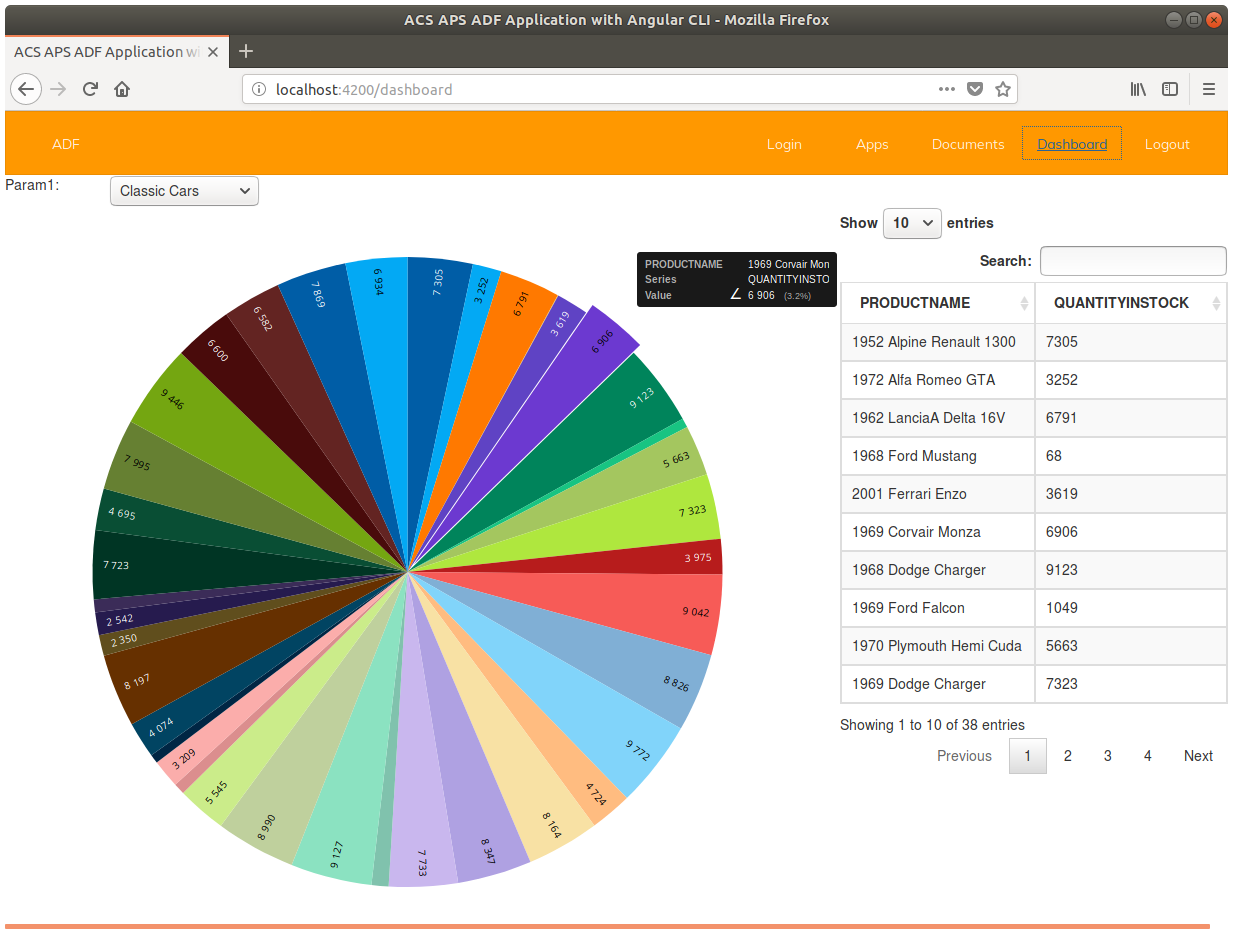
Screenshots
Troubleshooting and F.A.Q.
Sometimes the JS script is not loaded, despite the .angular-cli.jsonfile is correctly setup. The suggestion is to edit it and change the format (adding a space somewhere, for example) and restart the application. It will re-read the script and will receive the change with success.